
These are fast and easy to make! I made each in about ten minutes.
This tutorial will be for the skeleton, but for the pumpkin man they're pretty much the same.
You need 3 white and one black pipe cleaner (for the pumpkin man you need 5 orange and one green, just because you wrap the body more to make him fatter)
1. Fold the black pipe cleaner in half.

2. Fold the ends under just slightly. I used needlenosed pliers, but fingers work too.

3. Bend the two ends of the pipe cleaner to the length that you want the arms to be.

4. Fold the ends of the pipe cleaner up again, not quite in half. The middle bend is the neck; the two bottom bends will make the feet.

5. Attach a white pipe cleaner to the neck by twisting one end around the other.

6. Starting underneath the arms, wrap the white pipe cleaner around the black, leaving space so that the black will show through. Wrap all the way down until you get to where the top of the legs will be.

7. Begin wrapping the white one down one leg, leaving a little space in between so the black shows. At the bottom, clip the white pipe cleaner and tuck the end into the leg.

8. Join the remainder of the white to the other leg and wrap as before.
After cutting the pipe cleaner, save the rest. You need it for the next step.
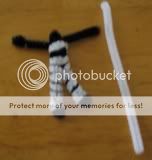
9. Stick the white pipe cleaner through the hole in the neck.

10. Fold it down in the front and back. This forms the spine and rib cage.
11. With whatever you've got left, wrap it around the body and tuck the end in.

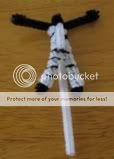
12. Join a new white pipe cleaner and wrap the arms, the only difference between this and the legs being that you wrap both down and back up the arms. When you're done, stick the end of the white pipe cleaner where the neck is.


13. Fold the end down at the height that you want the head to be and wrap the remainder around the neck.

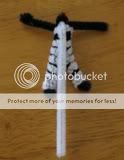
14. Join a new white pipe cleaner to the neck and wrap the head to get an approximately spherical shape. It doesn't have to be perfect.


15. Draw the face. Try and make it approximately as big as the head. Don't use paper that's too thin, and DON'T use marker; this will bleed when you glue the face to the head. I used tacky glue because it dries quickly and it's not as wet as your standard Elmer's glue. I'm not sure how hot glue would work out.

16. Voila! You're done!

2. Fold the ends under just slightly. I used needlenosed pliers, but fingers work too.
3. Bend the two ends of the pipe cleaner to the length that you want the arms to be.
4. Fold the ends of the pipe cleaner up again, not quite in half. The middle bend is the neck; the two bottom bends will make the feet.
5. Attach a white pipe cleaner to the neck by twisting one end around the other.
6. Starting underneath the arms, wrap the white pipe cleaner around the black, leaving space so that the black will show through. Wrap all the way down until you get to where the top of the legs will be.
7. Begin wrapping the white one down one leg, leaving a little space in between so the black shows. At the bottom, clip the white pipe cleaner and tuck the end into the leg.
8. Join the remainder of the white to the other leg and wrap as before.
After cutting the pipe cleaner, save the rest. You need it for the next step.
9. Stick the white pipe cleaner through the hole in the neck.
10. Fold it down in the front and back. This forms the spine and rib cage.
11. With whatever you've got left, wrap it around the body and tuck the end in.
12. Join a new white pipe cleaner and wrap the arms, the only difference between this and the legs being that you wrap both down and back up the arms. When you're done, stick the end of the white pipe cleaner where the neck is.
13. Fold the end down at the height that you want the head to be and wrap the remainder around the neck.
14. Join a new white pipe cleaner to the neck and wrap the head to get an approximately spherical shape. It doesn't have to be perfect.
15. Draw the face. Try and make it approximately as big as the head. Don't use paper that's too thin, and DON'T use marker; this will bleed when you glue the face to the head. I used tacky glue because it dries quickly and it's not as wet as your standard Elmer's glue. I'm not sure how hot glue would work out.
16. Voila! You're done!