|
|
|
|
|
|
|
|
|
|
|
|
|
|
|
|
|
|
 Posted: Wed Feb 17, 2010 6:20 pm Posted: Wed Feb 17, 2010 6:20 pm
|
|
|
|
|
|
|
|
|
|
|
|
|
Posted: Thu Feb 18, 2010 11:12 pm
 |
|
|
 |
Beware text wall...
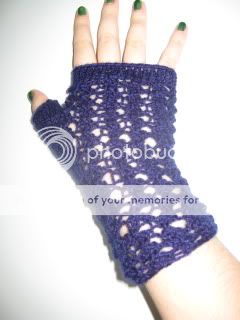
Lacy fingerless gloves
Materials:
Size 4 needles, dpn, 4 of them
Fingering weight yarn or something similar (weight 1) I used leftover baby sweater material
Stitch markers
Yarn needle and scrap yarn
*I am notoriously sloppy when it comes to gauge, therefore I don't know what it is. Sorry!
I am always open to criticism/ suggestions on how to make this pattern better!
The lace pattern is a multiple of 6, +5.
*NOTE: R2 and R4 will be knitted because they’re in the round! If you were to do a gauge swatch they would be purled instead!
Lace pattern:
{R1: K4, *YO, sl 1 st, K2tog, PSSO, YO, K3* and continue until the last K3 of the pattern, which is a K4 instead
R2: K all st (make sure the number of stitches didn’t change!)
R3: K1, *YO, sl 1 st, K2tog, PSSO, YO, K3* and continue until last 4 st, YO, sl 1 st, K2tog, PSSO, YO, K1.
R4: K all st}
The hardest part of these gloves is the lace! Because of the YO and PSSO stitches, it’s pretty much impossible to distribute the stitches evenly among 3 needles in a way that will work out nicely every single time. When it came to the sl, K2tog, PSSO part, there were some times when I had to transfer stitches to the next needle. My advice is, try knitting a few practice rounds before you get started! It will save you a lot of grief later on. The most common mistake I make with this pattern was at the sl, K2tog, psso part; I wouldn’t pass the slipped stitch over and so I’d gain an extra stitch.
Step 1: I cast on 29 stitches. It seems a ridiculously small circumference when you start, but trust me, these gloves stretch like crazy! Worry more about your gloves being too big rather than too small. The stitch distribution that seemed to work out the best was 11 on the first needle, and 9 on the other 2.
Step 2: K the first row.
Step 3: Begin the lace pattern, starting with the R1 sequence. Continue on with the lace pattern until the wrist part is as long as you’d like; I made mine about 3 inches long, which is 6 repetitions (R1 through R4) of the lace pattern. End with an R3 row.
Step 4: Here’s where things get interesting. Not only do you have to keep the pattern in mind now, but the thumb gusset too! =D
My general rule of thumb (ha ha) uses make 1 increases at either edge of the gusset, so that’s 2 increases every 4 rows. The make 1 increases will be done right next to the stitch markers. Interestingly enough, I’ve found that many people are unfamiliar with make 1 increases, so they can be found here if you need a reference: http://home.howstuffworks.com/knitting-instructions3.htm
Basically, you’ll start out with two stitches in between your stitch markers, but as you add increases, it will be 4 in between the markers, then 6, then 8, all the way until you have 14 stitches in between. Then, you slip 12 of them onto scrap yarn and you’ll be back to your original circumference. Don’t worry, I’ll include pictures!
You should be on an R4 row by now; K1, place marker, K all but the last stitch, place marker, K1.
Step 5: You’re ready for your first increase! Keep in mind that this is an R1 round because the rest of the pattern once you pass the stitch marker is the same (until you get to that second stitch marker, that is…)
K1, make 1, slip the stitch marker, K3, *YO, sl 1 st, K2tog, PSSO, YO, K3* till you reach that last stitch marker. Slip the stitch marker, make 1, K1. You should now have 4 stitches in between the stitch markers.
Step 6: K entire row, slipping stitch markers when necessary (R2)
Step 7: (This is an R3 row) K2, slip marker, * YO, sl 1 st, K2tog, PSSO, YO, K3* and continue until last 4 st, YO, sl 1 st, K2tog, PSSO, YO, slip marker, K2.
Step 8: K entire row, slipping stitch markers when necessary (R4)
Step 9: Time for your second increase. K2, make 1, slip the stitch marker, K3, *YO, sl 1 st, K2tog, PSSO, YO, K3* till you reach that last stitch marker. Slip the stitch marker, make 1, K2. You should now have 6 stitches in between the stitch markers. Notice that all of your increases will be done on R1 rows.
Step 10: K entire row, slipping stitch markers when necessary (R2)
Step 11: (This is an R3 row) K3, slip marker, * YO, sl 1 st, K2tog, PSSO, YO, K3* and continue until last 4 st, YO, sl 1 st, K2tog, PSSO, YO, slip marker, K3.
Step 12: K entire row, slipping stitch markers when necessary (R4)
Step 13: Continue this pattern of knitting and increasing until you’ve got 14 stitches in between your markers. After that last increase, you should just have finished an R1 row.
Step 14: Get your scrap yarn and needle ready. K the row as before, all the way until that stitch marker on the third needle. Remove the stitch marker and K 1 stitch; slip the other 6 stitches onto the scrap yarn. That’s the end of that row; now slip the first 6 stitches of the next needle onto the scrap yarn as well, then K the last stitch that’s right before the stitch marker. Remove the stitch marker. This is an R3 row, and you’ve already knitted the first stitch in the pattern, so begin with the YO and continue with sl 1 st, K2tog, PSSO, YO, K3 etc.
Step 15: Back to regular ol’ lace knitting, same as the beginning. I did 4 more sets of the lace pattern, i.e. 16 rows.
Step 16: K 6 rows normally and then bind off.
Whew! You’re almost done with one glove! Now all that’s left is the thumb… and the other glove.
THUMB: Remember those 12 stitches on the scrap yarn? Slip 5 onto your first needle, 5 onto your second needle, and 2 onto your third. K all twelve stitches, then with the third needle draw up two more loops from the top edge of the thumb hole, then continue knitting in the round (14 stitches total per round). After 6 rounds have been knitted, bind off and weave in all loose ends.
Repeat for other glove!
|
|
|
|
|
|
 |
|
|
|
|
|
|
|
|
|
|
|
|
|
|
|
|